Tuesday, April 22, 2014

Buds!!


It isn't even May and my pumpkins have buds on them already.  Things may get out of hand considering that I won't be able to move any of my plants outside for another 3 weeks at the minimum.  My melons have buds as well.  And, one of my tomatoes has hints of flowers!

Bathroom Cabinet


Now that the floors are done I have quite a bit of excess or unusable wood.  Considering that I paid for this wood I would rather not burn it.  So, I had to figure out a way to put it to use.  And, considering my fiber-less state I cannot finish constructing the exterior walls until I have the fiber to insulate with.

I couldn't think of anything to work on aside from the sinks.  Since the bathroom sink is much smaller than the kitchen sink and won't have surrounding counters to deal with it seemed like the perfect place to start.


I started the main structure by fastening the oak flooring together.  This is a dangerous task!  Those nails ricochet right off of the wood and have no trouble at all finding my face. 

I want my bathroom cabinet to have at least 2 shelves and I couldn't figure out a way to do that aside from making "legs" for them to stand on.  This also makes the feet a bit more sturdy as there is more floor coverage.


My first attempt at mounting the sink was abandoned partly due to the fact that this contraption just kept getting taller and TALLER!  The height itself was perfectly fine by me but it looked rather odd.  Plus, I figured out a better, more secure way of constructing this. 


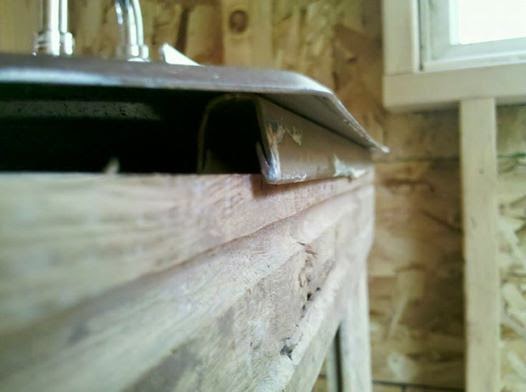
The best part of this sink is the rails that it sits on.  I have never seen anything like it and I didn't even notice it when I bought the thing.  But, currently I am basking in the glory of it.  These rails fit perfectly into the tongue OR groove of the flooring. 


I also have an abundance of short pieces of cedar leftover from the walls.  What better material to make shelves out of?  I will use the cedar to encase the portions of the cabinet that I want closed in as well.  Still lots to do but it's a start :)

Bathroom Floor Completed


With the 4" flooring the installation time is cut in half it seems.  It only took a few hours to finish the floor.  It would have taken less but getting the floor around the toilet was a bit of a challenge.  A bit of advice... Install the floor BEFORE the toilet!

Wall Zig


I got the next section of wall squared up and constructed.  I almost had a meltdown when I discovered that I should have extended the kitchen side of the wall out another 3/4 of an inch to cover the seam of the perpendicular wall section.  So, I had to think on this matter...

I decided to save myself 2 1/4 inches and simply have the bathroom side of this little "zig" be rough sided.  This little portion of the wall is only single thickness rather than having a stud encased with cedar on both sides.  This solved the problem of an unsightly seam and saved me much needed width in both the kitchen and bathroom.  The rough side of the wall doesn't look bad at all.

Saturday, April 19, 2014

Plumbing... FINALLY!

After MONTHS of peeing in the bushes I can honestly say that I will be THRILLED to use this toilet for the first time!  I have been wanting to get the water and septic hooked up for quite some time but as it is a 2 person job I was at the mercy of... well the person that held me up the whole time!

I got so disgusted with waiting that I finally stumbled across a reliable person to hire.  And, in 2 days time I have the first item plumbed into the cabin.  It should have taken half a day but...

All of my water lines will be run on the exterior of the walls and covered with a cedar casing.  This way if there is ever a leak I can easily access it and it won't damage my walls.


Building My First Wall... Ever!

I have started constructing the first wall of my cabin.  It will be the only wall too!  It's not a typical wall.  It is going to zig and zag.  In order to have my claw foot tub in the position I want it in I had to get creative with my wall building.  When I placed the windows I did so envisioning laying in my tub gazing out the window.  Okay, so maybe there are 2 windows to gaze out of from the tub...

Well, seeing as my cabin is tiny I was having considerable difficulty making the floor plan I wanted actually function.  In order to have the kitchen wide enough so that the refrigerator and oven doors are able to open I had to recess part of the bathroom wall to give me the additional space I needed.  All of this because of my claw foot tub.  It is 60 inches long and I was unwilling to give up on my window gazing so the space had to come from somewhere.  So, I made a short section of wall just long enough for the width of the tub and the rest of the wall will be recessed for the stove and refrigerator.  I've only constructed the part of the wall that is the width of my bathtub so far...


Refinishing My Claw Foot Tub

As I was shopping around for a claw foot tub for my cabin I quickly realized that these little guys are fetching a high price.  If you want one that is in good shape you better be prepared to pay!

After weeks of stalking Craigslist I saw an ad for a tub for only $65.  The ad clearly stated that it needed to be refinished.  But, for $65 it was impossible to pass up.  The photos made it look to be in fairly good condition and to be honest it was for the most part.  There were some rusty spots on the lip and around the faucet area but other than that it could have been used as it was. 

I decided to give it a makeover as I clearly don't have enough projects going on already!  Plus, it is easier to do this before it's installed than a few years down the road when it really needs it.  So, I bought my enamel kit which was only like $33 on Ebay and quite easy to find.  I would say that anywhere such as Home Depot or Lowe's would carry them.

Sanding and cleaning the tub took the most time out of everything.  I likely did much more sanding than necessary but I want it to look as good as it can after all.  Applying the enamel only took about 15 minutes per coat.  It wasn't quite as warm as the instructions recommended but rain was imminent and I didn't want to have to sand again once the moisture caused rusty spots where I had sanded down to bare metal.

I can't say how the enamel will hold up as it isn't even fully cured yet but so far so good.

The first photo is the tub before I started on it.

The second photo is the tub after sanding and cleaning.

The third photo is the tub after the first coat of enamel.


Friday, April 4, 2014

New Logo


This is my new and improved logo with custom artwork done by my personal friend Karen.  I asked for a waving tree and she sketched this beauteous creation.  She is an amazing artist and I'm glad to have her help and friendship.

Top Bar Hive


These are the top bars for the hive and they are recycled utility oak flooring that were unusable at the cabin.  Being utility grade there is no coating or finish.  Just solid wood.  These will remain durable for years.

Custom Beehive


My hive is progressing nicely.  It will soon be ready for my bees.  This is a massive hive by normal standards but I don't plan to be constantly shifting things around.  I want my bees to have enough space to build their home how they want it and leave it that way.

The interior is hardwood and the exterior will be tongue and groove cedar.  It will be insulated with alpaca fiber.  I can't wait until there are happy bees buzzing around inside!